Showing posts with label craft project. Show all posts

tassels with the nester


Nester is having a tassel party today, so I'm joining in. During the Christmas season, I posted here about a couple of tassels that I made. Since then, I've made a few more. What a great project-especially if you need instant gratification like I do.


This tassel I made using a small cross ornament that I found at Hob Lob during the holiday season. I screwed the bottom of the cross to a candle cup (also found at HL). Then I just glued fabric and ribbon at varying lengths inside and around the candle cup. To finish it, I added trim around the top (to hide the candle cup) and a ribbon to hang it with.

This one is fun with all the pink and green. I made it to coordinate with a friend's nursery.

And, this one I made using ribbon and some left over scraps of fabric.

If you need a quick, cheap, easy project that adds a fun touch to your home, give this a try!

sunshine and spray paint


Finally, enough sun and warmth to get outside and do a little spray painting. I've had this project in mind for a little while. I decoupaged my L with wrapping paper and spray painted a grapevine wreath. I'm not sure if I like it just yet, I may have to do some adjusting. In fact, I have another idea I might try. But, either way, it felt so good to get outside and my door sure did need something to cheer it up!


Craft Project: Tassel


After seeing a couple of tutorials for tassels, like this one and this one, I knew this was something I'd have to try. So, I did. I used knobs from Hobby Lobby, some ribbon, a little burlap (on the cream and brown one) and some trim. This was such a fun project. There are so many possibilities!


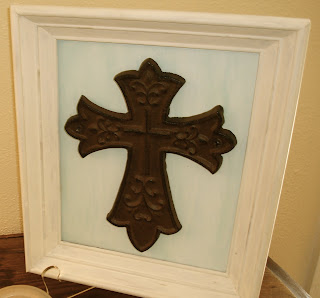
Cross Your Art


I am loving all the metal crosses that I've seen everywhere. Hobby Lobby has had some really great metal ones-a lot of them are on clearance now. Most of them, however, require that the cross be drilled to something (like the wall or another piece of wood, etc.). Not wanting to attach the cross to the wall, I had the idea of framing the cross. Well, it just so happened that I had an extra piece of wood that was just the perfect size. I also had a frame that I'd picked up at a yard sale. So, with a little experimenting for the color, I painted both the wood (a light blue) and the frame (an off white). I distressed the frame a little and then attached the cross to the wooden board and the board to the frame. This was super easy and quite inexpensive (less than $10). I really, really love the way this turned out! 


Door Decor

Awhile back, my mother-in-law showed me this picture because she knows I enjoy floral arranging. It's from Budget Decorating-a Woman's Day publication. As you might notice, I tore it out and have been holding on to it for quite sometime. 


I have been on the hunt for a perfect bucket to make an arrangement for our front door. I finally found the perfect door bucket, but it was just a plain galvanized bucket. I thought about painting it, but then saw some wrapping paper and new that would be just perfect-it's damask. So, I cut out the shape of the bucket with the paper and decoupaged away. Then, I got some fake flowers (oh, the tragedy) and made this little arrangement. I'm loving it for summer!

Silver Service

Well, I'm a copy cat. But, isn't that the great thing about blogging-getting new ideas? Shannon, from Bless Our Nest, always has the cutest silver trays that she turns into chalkboards. So, this past weekend I went to a few yard sales and picked up this tray for 50 cents. I was so excited because I knew that it would be the perfect chalkboard. Here it is before it got the treatment. See all those scratches?


And, here it is now, in its new life, with a few coats of chalkboard paint. Recycling at its finest!


Now, don't forget to come back tomorrow to see what's up at Sister's. It's my new series-Sister See. We'll be visiting her on Thursday to check in on her new place and the progress we're-I mean I'm- making with all of our projects-and by that I mean all the projects my mama keeps suckering me into doing. No really, it is a lot of fun and I do love a good project. Anyway, you can click here to see last week's post.


Polka Dot Your Pot


If you were expecting a Wreath for Wednesday, I must apologize. I think that little mini series has come to an end. But, here's a little quick project that you can do. Get yourself a clay pot and paint that pot black (or another color that you like). Then add some cute, little polka dots with white paint (or another color that you like). Add a little plant or flower and you are finished! This is a quick, easy and cheap project-great for a gift or for yourself!

DIY-Framed Chalkboard


After seeing these all around blogland, I knew this was a project I'd like to try. It's only taken me six months to make it happen. This was super easy, though. Here's what you need:

-frame of your choice (mine is 16x20)
-piece of smooth wood cut to fit frame
-chalkboard paint
-paintbrush
-hubby (optional)
-ribbon (also optional)
-chalk


I got my frame (no glass or back) at Hobby Lobby during their recent 66% off clearance, it was $12. Hubby got me a smooth piece of wood cut just right. I painted the wood with a couple of coats of chalkboard paint and let that dry. Then hubby nailed the painted wood in the frame. I tied on some ribbon, hung it up and wrote a little message. And, there you have it - a framed chalkboard. I'm loving it hanging in my kitchen!