Craft Project: Tassel


After seeing a couple of tutorials for tassels, like this one and this one, I knew this was something I'd have to try. So, I did. I used knobs from Hobby Lobby, some ribbon, a little burlap (on the cream and brown one) and some trim. This was such a fun project. There are so many possibilities!


Oh Christmas Tree


Not much has changed this year, as far as our Christmas decorations. In our living room, we have a tree decorated in brown, cream and a light turquoise. I bought most of these ornaments the first year Jamie and I were married at an after Christmas sale. And, I've added a few here and there. The ornaments complement the colors in our living room perfectly. I love how cozy the living room feels with the glow of the tree. Ahhh! Hope you are enjoying this Christmas season!

Merry, Merry


We got all decorated for the holidays this past weekend. Now, we're just enjoying the season! I'll be posting pictures of our Christmas decor over the next few days. And, there'll even be a few a projects here and there.

Here's a wreath that is hanging in our guest bedroom. And, did you notice the sign? It's true, I want it all!

Gobble, Gobble


After putting away all the Halloween decor, I pulled out this guy. I keep my pumpkins out through Thanksgiving. But, he's the only thing I have specifically related to Turkey Day. Kind of a cutie, I think!

Mantel Makeover


I haven't posted too many pictures of our fall decor, so I thought I'd make up for lost time today. Here are a couple of shots of our mantel. Our mantel is usually one of the most challenging things for me to decorate. But, for fall it came together pretty easily. This arrangement is very simple, yet I really love it. The symmetry of the candlesticks and pumpkins on each end works well with the off-centered monogram print. This arrangement just feels cozy, like I want my home to feel during the fall.

Fall Break?

Well, it seems I’ve taken a little Fall Break. Life has just been busy lately. You might notice I got a facelift, too! It was just what I needed to welcome me back from my break. Sister bought this makeover for me from The Design Girl. LOVE IT!!!

What do you think?

So, now that I’m back, I’d better get busy with some projects. I’ve got plenty of them to do, that’s for sure. Just not sure which ones to tackle first. I’ll keep you posted, though. And, no more breaks!

All That Glitters Is Gold


After seeing some of Martha's glittered pumpkins, I wanted to try some for myself. Last year, near the end of fall, I got a few ceramic pumpkins on sale (90% off) at Hobby Lobby. They have just been waiting for the perfect project. So, I got out my Martha glitter and got to work. And yes, you do have to use the Martha Stewart glitter. I couldn't quite understand how Martha could make her glitter so special, but she does. It is so airy, like powder and just has more sparkle.

This project is pretty easy, but somewhat time consuming and very messy. All you have to do is spread glue or Mod Podge on the pumpkin(s) evenly then sprinkle on the glitter. I did my pumpkins section by section for a smooth application. Let them dry for a little while -I let mine dry over night. Just be prepared, the glitter gets everywhere. But, in the end you'll have pretty little pumpkins to add to your fall decor.

Happy Fall!

Fallbulous


It's not quite fall, but Labor Day weekend marks the start of my fall decorating. Jamie got the plastic tubs down from the attic and I started putting out the pumpkins. I've still got quite a lot to do, but here's a little peek.


Are you ready for fall? I am. I just love this time of year! I'm also excited to see all the decor from other bloggers and get new ideas for some crafts to try.

Friday's Favorite


Happy Birthday, Daddy! I love you and hope you have a great day!!!


Get excited, it's Friday! There is nothing like a Friday during football season here in Auburn. The town is all a buzz and everywhere you look people are sporting their orange and blue. Final preparations are being made before the big day on Saturday. Well, we're ready! We've got the vehicles loaded and coolers filled. Here's our checklist: generator, tv, coolers, tents, chairs, tailgating box (that's right, we've got a box (on wheels) filled with all of our weekly essentials), tables, and don't forget the cute orange and blue serving pieces. Our weekly schedule has been executed well. Now all we have to do is go cheer on our Tigers!


Happy Friday and War Eagle!!!

Sister See


I missed last week's post from Sister's house, but here's what she's been up to-trying to figure out paint colors for her kitchen, living room, guest bathroom and laundry room. Plus, she's getting her kitchen cabinets and bathroom vanity cabinets painted. She had a hard time making a decision, as you can see.


But, she's finally narrowed it down. The painting should start any day now! It is going to be such a change. We're really excited!!! I can't wait for the final results.


Stay tuned for more from Sister's!

It's That Time of Year


College football season is almost here. For us, that means tailgating. Each year we try to make a few improvements to make things easier for the next year. Well, this year we kicked it into high gear getting ourselves organized. We've been working for weeks now to ensure a smooth and successful tailgate for Saturday. We even held an official tailgating meeting and established a schedule for each week. Yes, we take this stuff very seriously! Here's just a peek at what we've been up to.
I'll be doing a few more posts over the next few days that include more of the details. But for now I'll leave you with WAR EAGLE!

Going Green


In my dining room that is. I got this basket and cute little sign for my birthday, several days ago. They both have the same chippy, green patina. My dining room chairs just so happen to have a pale green fabric on them, too. I didn't really plan this, but I'm loving the way it's all working together. More pics to come once everything is in place. 


Friday's Favorite


You may remember this little table from a previous post of our house tour. This mirrored table serves as my bedside table in our master bedroom. I got it from my favorite furniture store, At Home. I love this little table. It could easily move to our living room or another bedroom, making it a very versatile piece. I love furniture like that-pretty and practical. So, it's my favorite for Friday. 


Happy Weekend!

Sister See

Whew, it's been a week since my last post. But, I'm back with some new pictures from Sister's. Last week she had granite countertops installed in her kitchen. They are just gorgeous! 

Here's her kitchen before she moved in, with the previous owner's stuff. 


And, here are the new countertops! She also got a new sink and faucet. Pretty, aren't they?


In a couple of weeks, she'll be getting the cabinets painted, new hardware and new appliances. Cooking is her thing, so a shiny, new kitchen was in order! I can't wait for it to all come together. Christmas baking (well, I'll just be watching) should be so much fun!

Thanks for stopping by for Sister See. As always, you can come back every Thursday for more!

Sister See


It's Thursday and that means I've been over at Sister's taking some pictures. Here's her entryway. In true Nester style (click here to learn about Nester) we hung plates on the wall and used what she had. I call it playing house. I often ask Sister if I can come over and play house. This usually results in her rolling her eyes at me. I don't care, though!

This weekend we're going to play house as we finish up one of her guest bedrooms. But, don't worry, I didn't invite myself. I was actually invited this time! And, there are big changes going on in Sister's kitchen. Hopefully, I'll have some spectacular before and after pictures to post soon!

Make It A Monogram: Tutorial


Last week, I showed you a monogram I created for my desktop background (click here). Today, I'm going to show you how I did it. So, now you'll be able to make your own monogram!

1. Go here to download this monogram font

2. Read the directions here on how to download fonts 

3. Open Microsoft Word

4. Install a text box


5. Add your initial using the monogram font. I made mine a size 200 for the middle letter and 150 for the two side letters. You will need three text boxes-one for each letter. The reason you add text boxes, rather than just typing it out, is so you can move the text boxes around.


6. To get your monogram just right, you'll have to play around with the size, how you want the letters to overlap (having text boxes allows you to move the boxes so the letters overlap) and your colors (background).


7. When you get it like you like it, save your monogram and add it as your background. You could also use this to create your own note cards and such!

I hope this helps! I'll be happy to try to answer any questions.

Homey According to Hubby


I'm kind of at a loss as to what to blog about. I've got about a million unfinished projects, but nothing ready to post. So, I've been trying to think about things in my house that I haven't blogged about already. 


I thought about what it takes to make a house a home. Well, according to my hubby it is a plant. I'm kinda just kidding. But, in all seriousness, my hubby does like house plants. He rarely has an opinion (not because he's not asked) when it comes to house decor. But, when my mom brought this particular plant over, he noticed it right away. He actually said he liked it because it makes the house look homey. Now, I do agree with him. However, I just thought it was pretty funny considering what things go unnoticed around here. So anyway, there you have it. If you need to make your house look homey, just add a plant or two. 

I hope I'll get back into the swing of things within the next few days, so stay tuned!

Sister See


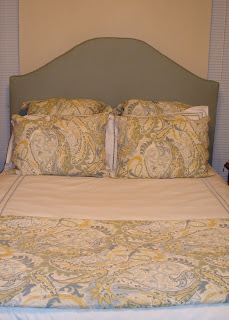
I am very excited about this week's post. My sister got an upholstered headboard. I hired my MIL to make it for her. It turned out wonderfully. Sister loves it and so do I. It's actually a magic headboard (now Sister, don't get mad, Puh-lease!). It has the ability to make one, who normally doesn't make the bed each day, make the bed each day.


In case you can't tell from the pictures, it is a light turquoise linen fabric. She's had her bedding, from Pottery Barn, for a little while now. It is a perfect match for the headboard, even though she was planning to get new bedding. We like it so much with the headboard, though, I think she's decided to keep it.
 

Anyway, pictures just don't do it justice. It is so, so gorgeous! She's still working on getting everything else fixed up in her bedroom (curtains, art for the walls, other accessories, etc.), but this was a great start!


Hope you enjoyed stopping by at Sister's. She has been working hard on transforming her house into her home. It is really coming along nicely! Come back next Thursday for more from her house!

Make It A Monogram

I love a monogrammed anything. There is just something so classy about them. Well, one day I saw a monogram as a desktop background. I thought it was a fabulous idea. So, I went about making my own. It was actually pretty easy. 


What do you think? This is a screen shot from my computer. I love, love, love it! I'm working on a tutorial so you can all have one of your own! I know, very exciting stuff!!! So, stay tuned and it will be up sometime next week!

Don't forget about Sister See tomorrow. I'll be showing you something so pretty from my sister's house. You won't want to miss it!!!

Diffuser Reuser


I am not the best at recycling in the traditional sense of the word. However, I think I do my part with all of the furniture I have upholstered and all the junk I refurbish and repurpose. A recent repurposing trick I discovered is to reuse a reed diffuser container for a small bud vase. Once all of the fragrance has evaporated, you can wash it out and add a pretty little flower. Most of the containers are small and pretty, making the perfect little vase. Here's what one of the containers looked like as a diffuser. And then below is how I used it for a bud vase. So, that's how I'm doing my part to reduce, recycle and reuse!


Wild One


I spotted (ha, ha) these place mats on clearance-a $1.50 each at Wal-Mart. So, I figured they would be a nice addition to our dining room table. I turned them so that they would hang, like a runner, rather than placing them flat. They are just what we needed for a walk on the wild side!